
In this tutorial, we’re going through all the steps needed to setup phone number verification via SMS for WooCommerce orders. We’ll set up a coupe of rules that will make new customers to our WooCommerce store verify their cell phone number by clicking a link sent out via SMS. We’ll also see how you can customize the behaviour when the link is clicked to suit your needs.
The tutorial describes how to set up a few different workflows. The first workflow will check if the customer has shopped with us before and if so, set a custom field named “verified” to the value “true”.
The second workflow will perform the same check, but if the customer is not known to us it will set that custom field to “false” and send out an SMS to the phone number provided in the order.
Lastly, the third workflow will trigger when the customer clicks that link and update the “verified” custom field to the value true.
Requirements
Before we begin. Let’s look at the requirements for this to work, you need the following plugins installed on your self hosted WordPress site:
- A WooCommerce store.
- Admin Columns (free) – we use this to show the customer status in the WooCommerce Order list.
- WunderAutomation (free) – we use WunderAutomation to set up the workflow.
- WunderAutomation add-on for Twilio (premium) – We’ll be using this to send out the SMS messages via Twilio.
We’ll assume that you’ve already set up the Twilio plugin as described here. Note that if you for some reason can’t pay the for the premium Twilio plugin, it’s also possible to send messages via Twilio via the built in REST API action, it’s a little bit more complicated and described in this article.
A word about order statuses and payment providers
First a word about order triggers. Each payment provider comes with their different settings that affects the order status for new orders. The most common situation is that a new order gets the order status “Processing” once the customer have submitted the order and completed the payment details on the checkout page. This is the default behaviour for the Stripe plugin.
Another common situation is that the new order is set to “On hold”. This is the default behaviour for the built in Cheque payment method since it assumes that you first have to wait for a physical cheque to arrive in the mail. The idea is that when you’ve received the cheque, you manually change the order status to “Processing”.
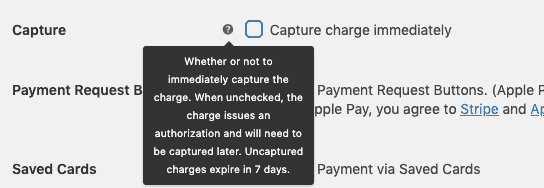
Note that the Stripe plugin can also be configured to NOT capture the payment until you manually set the order to “Processing”. When you run with these settings new orders will show up as “On Hold” and you’re given the opportunity to choose if you want to accept the order or not.
The point of this tutorial is to build workflows that lets you hold of processing an order until you have verified that the customer is either a returning customer that you trust or has proven to be a real person by verifying the phone number. The rest of this tutorial assumes that new orders comes in with status “On hold”.
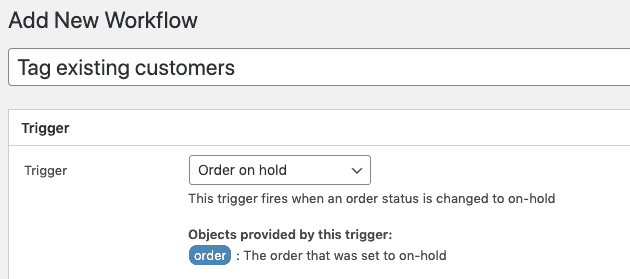
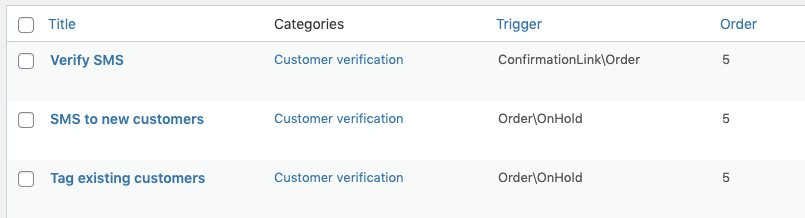
Workflow 1 – Tag existing customers
The first Workflow we create will create a custom field on customers that we recognize from before. The trigger:
The filter, we’re going to require that the customer has at least one completed order in our store. This filter checks all orders with the same billing email address and counts the ones that have status completed:

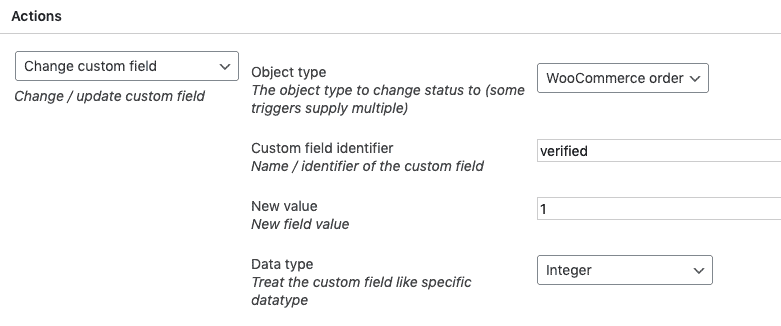
And the action. If the filter above passes, we know this customer has shopped with us before so we update the custom field “verified” to the value of 1.
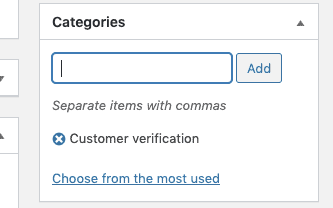
We’re also going to give this workflow a category called “Customer verification”, this makes it easier to group various related workflow together in the workflow overview list
A possible enhancement could be to automatically set the order status to processing for existing customers. We’ll save that for a discussion further down in this tutorlal.
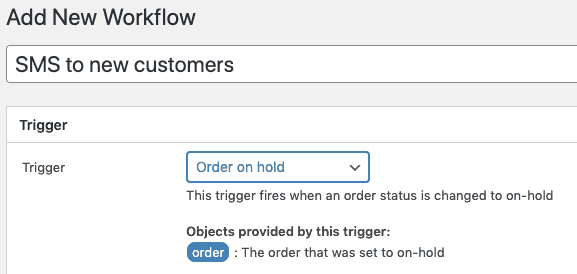
Workflow 2 – SMS to new customers
The second Workflow will use the same trigger, but filter out customers that have zero completed orders. The trigger:
The filter:

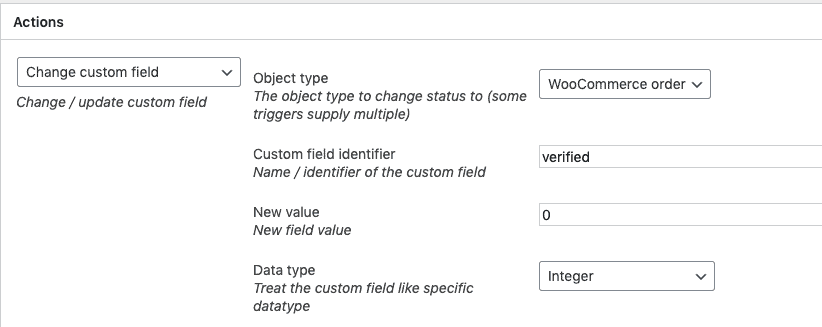
The actions. The first action tags the customer as NOT verified by setting a zero in the “verified” custom field:
and the second action sends out an SMS with a link:
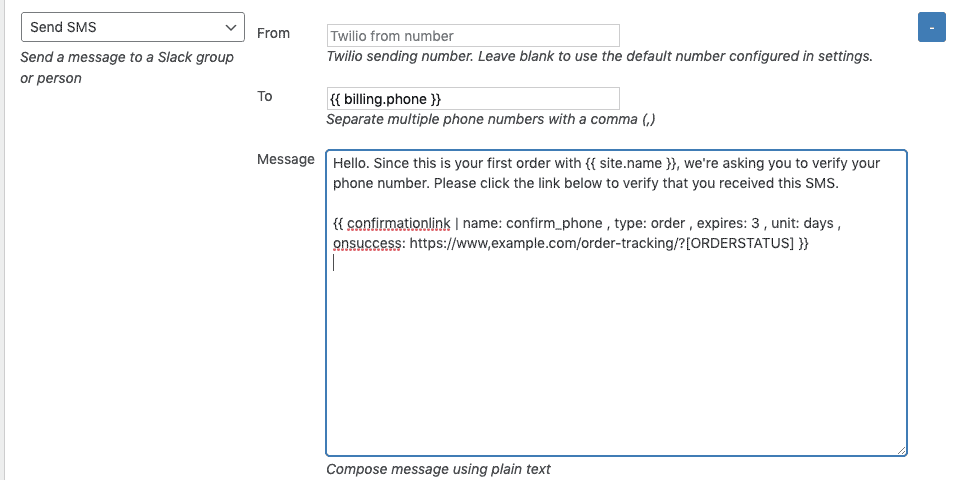
The settings for the outgoing SMS requires a little bit of discussion, particularly the confirmationlink parameter.
The parameter itself works as any other WunderAutomation parameter. You create a placeholder that is pasted into the message text box and when the workflow runs it’s replaced with something else, in this case a link. Let’s look at the modifiers for this:
| Modifier | Description |
| name | This creates a unique name for this type of link. If we have other workflows sending out other types of verifications, we’d need a way to separate them from each other. |
| type | This specifies that when this link is clicked, the workflow that detects it will treat it as a link dealing with orders |
| expires and unit | This specifies that the link will only be valid for a set number of days. |
| limit | (not used in this workflow). By default a confirmation link expires once it’s clicked once. You can optionally specify that a link should be valid for more than one click. We don’t want that behaviour here, so we can go with the default of 1 (one). |
| onsuccess | This is where the user is redirected when he clicks the link before it’s expired. For a WooCommerce order, it’s recommended to redirect to a page with the |woocommerce_order_tracking shortcode|. By adding ?[ORDERSTATUS] to the URL, order status for the order will be displayed directly. |
| onexpired | (not used in this workflow). If the user clicks on the link after it has expired. He is shown an error message. If you prefer to send the user to a specific page instead, it can be configured here. |
(as usual, you don’t have to figure out how to write the parameter editor)
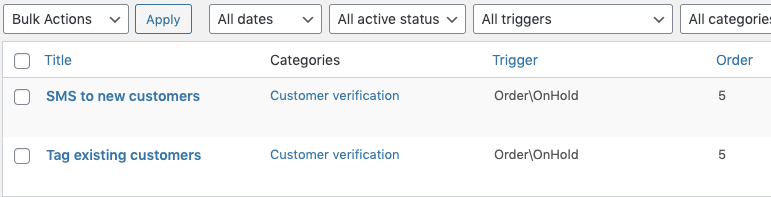
Lastly, we assign this workflow to the “Customer verification” category. We now have two workflows here:
Third workflow – Detect clicked links
The third and last workflow in this tutorial will detect when a user clicks the confirmation link. To do this, we create a workflow using the trigger “Confirmation: Order”:
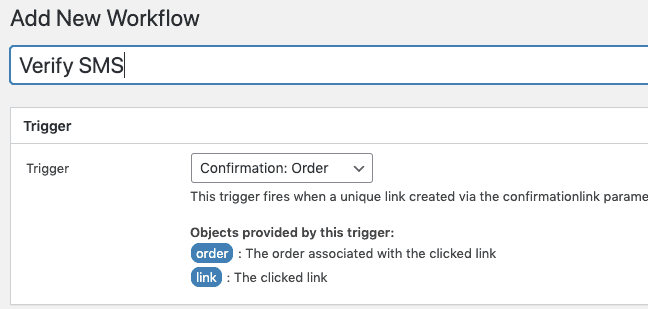
We’re going to use a filter to make sure the clicked link is from the previous workflow, remember we named the link “confirm_phone”.
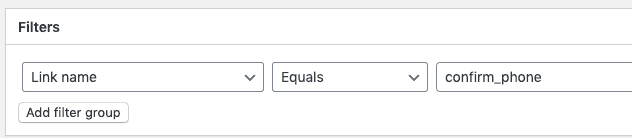
When this filter passes we know that the phone number in the original order received our SMS and whoever holds the phone have clicked the link. This makes us pretty sure that the order was placed by a real human, so we can update the custom field, this action is exactly the same as we used in the first workflow.
As with the two previous workflows, we put this into the “Customer verification” category:
Workflow overview
Showing verification status
With the three workflows in place, we now have a method that sets a custom field on all incoming orders that indicates if the customer is verified or not. Returning customers are automatically verified, new customers need to first confirm their cell phone number.
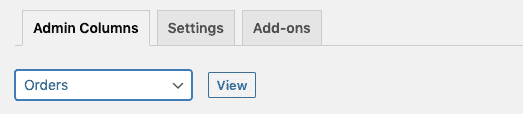
This section of the tutorial assumes that you have at least a little bit of experience with using the Admin Columns plugin. If not, take some time to learn the basics from their getting started guide.
We’re going to add a column to the WooCommerce order type:
The column we’re adding is going to pick up it’s value from the custom field named ‘verified’. We’re going to make it into a True / False field so that Admin Columns shows it with a little bit of style.
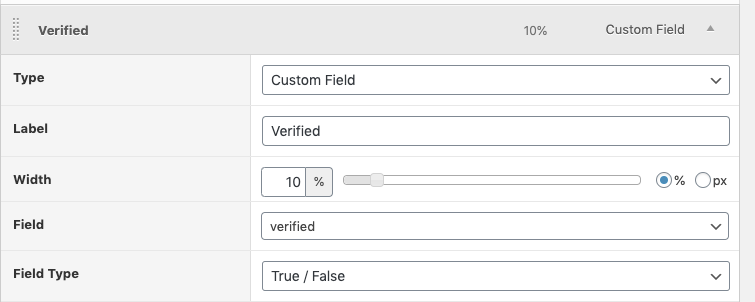
…and we order it so that it shows up right after the order status field:
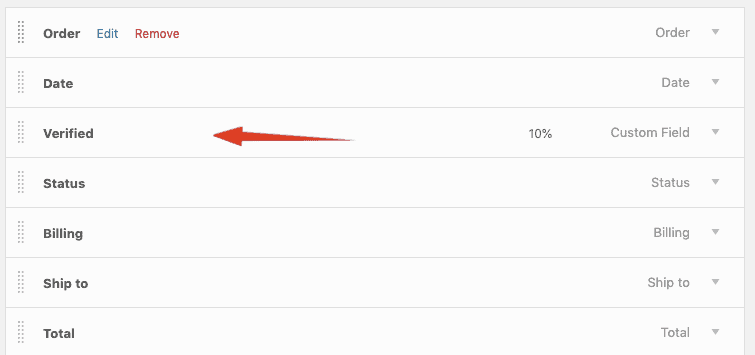
The result:

Discussion
We’ve just shown you one way to add automated SMS based phone verification to your WooCommerce site.
There’s a lot of things that we could have done a little bit different. For instance, we could have added an action to change the order status to “Processing” as soon as a customer was verified. Or we could have sent out an email instead (if we really trust that). Perhaps the resulting workflows would have suited you much better if we had added a custom checkout field explicitly for cell phone numbers. Or you’d like to be able to modify the “verified” field manually on the order details screen? Does your shop orders always come in with status “Processing” and you want to keep it that way?
Well, you can just as easily use other WunderAutomation triggers and actions to change the behaviour of these workflows. It’s the exact point, a #nocode way of customizing your WordPress site.
And for using different fields? There are great plugins for that. If you’re already using the (free) Checkout Field Editor you can easily adapt the workflows to work on those fields. The same goes for using the (free) Advanced Custom Fields, WunderAutomation is perfectly happy to work with those fields as well, it even has built in support for ACF.
And that’s exactly the point of WunderAutomation and the add-ons we provide, They can be adjusted to suit your exact needs, often based on already existing well functioning building blocks. WunderAutomation is the advanced glue you’ve been looking for. But without requiring you to write additional code.
So we’ve quite happy to leave this tutorial as it is and let our readers figure out exactly how this should be optimized for each individual WooCommerce shop.
Hello,
Can we use google firebase in sms system?
Hi,
As far as we know, Google Firebase uses SMS verification for its own purposes, it does not expose an API that would let third party software “piggy back” on their infrastructure. So no. Any reason you couldn’t just use Twilio?