
Regardless if you use WordPress as an income generator or if it’s more of a hobby project, over time you will find more and more things that you wish you could automate. In this tutorial, we’re showing you how to get started with WunderAutomation, an automation tool explicitly designed to help you take out some of the manual steps of running a WordPress site efficiently.
What is WunderAutomation
If you ever heard of Zapier or IFTTT (If This Then That) you’ve probably already have some idea about what an automation tool can do for you. But where IFTTT helps you save email attachments to Dropbox, WunderAutomation helps you automate tasks within WordPress.
WunderAutomation is a WordPress plugin that allows you to write workflows (like Zaps or recipes) on the form “When this happens, and that is true, do this action”, much like the other well known automation tools but within your own WordPress site. There are numerous of different triggers (user login, post saved, order created) that are used to kick off a workflow. There are also several filters (order amount, user role, post content) that are used to create logical rules to determine if the workflow should continue or not. Lastly, there are a wide selection of actions that can do various things like update post status, change user role, update a custom field or call a webhook on an external system.
The combination of triggers, filters and actions creates literally endless of possibilities to create efficient automation workflows for your WordPress site. There are also a number of add-ons available to interact with popular services like Trello, Google Docs, Slack to name a few.
In this tutorial, we’re going to show you how to send an HTML welcome email to a new user just after the first login to the site.
Installing WunderAutomation
To get started with WordPress automations, the first step is to install the WunderAutomation plugin.
WunderAutomation installs like any other plugin from the WordPress repository. The easiest way is to go to the plugins section on our WordPress dashboard and click Add new. In the search box, type in “wunderautmation” and follow the usual steps. Searching for WunderAutomation you should see this:

Click “Install now”, wait for the download and then click “Activate”.
Creating a WorkFlow
To create a new workflow, we’ll just go to the Automation menu, select Workflows and click Add Workflow to open up the workflow editor screen.

Workflow settings
To configure this workflow, we’re going to (1) name the workflow, (2) select a trigger, (3) set a filter and (4) create an action and user parameters.
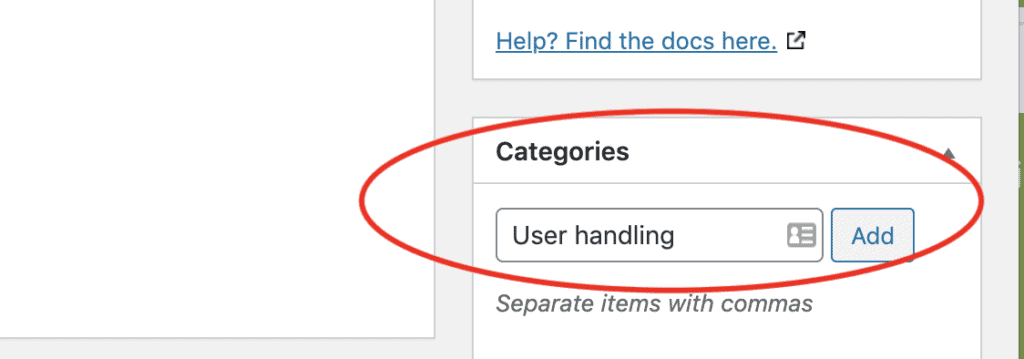
Set a name and category

The workflow name is mainly for internal house keeping. As the number of workflow grows over time, setting a descriptive name will help you keep track of all your workflows. It’s also possible to group workflows into categories to further help you keep workflows organized.
Select a trigger
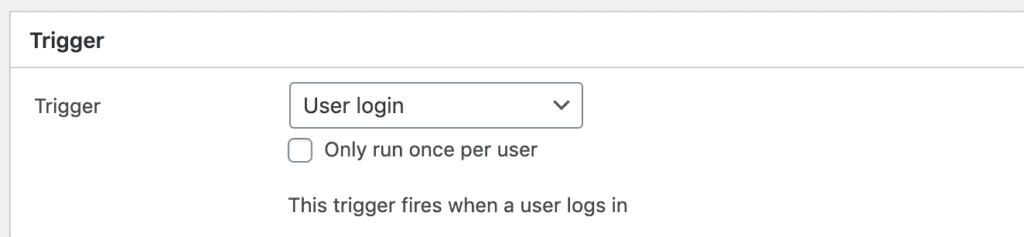
There are numerous of different triggers to select from, but in this tutorial we are interested in reacting to user logins, so we’re going to use the “User login” action. This will trigger our workflow every time a user logs in.
Set filters
In this tutorial, our end result is to send an email to a user at the first login to our site. The easiest way to achieve this would be to use the “Run once per user” checkbox on the trigger. That would cause WunderAutomation to internally keep track of which users we’ve already run this action for.
But in the interest of flexibility, we’re going to create a user login counter to keep track of the number of logins for each user. This opens up for setting up more workflows in the future to trigger an email on the 5th, 10th or 15th login from the same user. This also lets us show some of the really cool features in WunderAutomation.
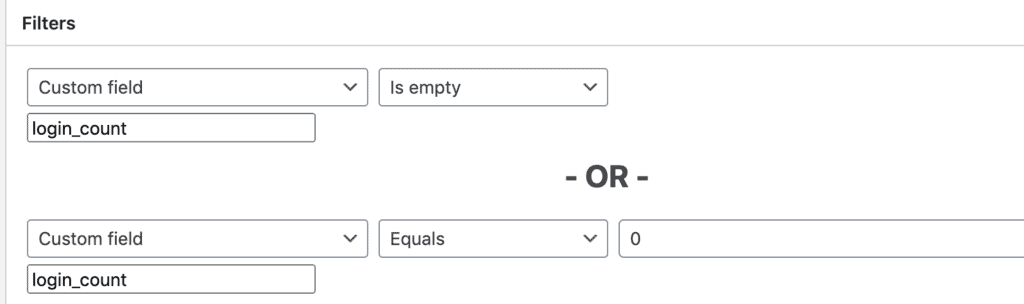
For now (when setting up the filters), we’re going to assume that there is a custom field on the user with id = “login_count”. We configure our rules so that we want the workflow to continue if (a) the custom field “login_count” doesn’t exist, “is empty” OR if the field exist but have the value zero (0).
At little later, we’ll ensure this field exists and have an accurate value.
Set actions
If our filters pass, that is if there is either no field with id “login_count” or if it exists and have the value zero, we’re going to run our actions. For this tutorial, we need two of them.
Action #1 – Set or update login_count
The first thing we’ll to is to create (or update) the login_count custom field. To do this, we’ll add a Change custom field action:
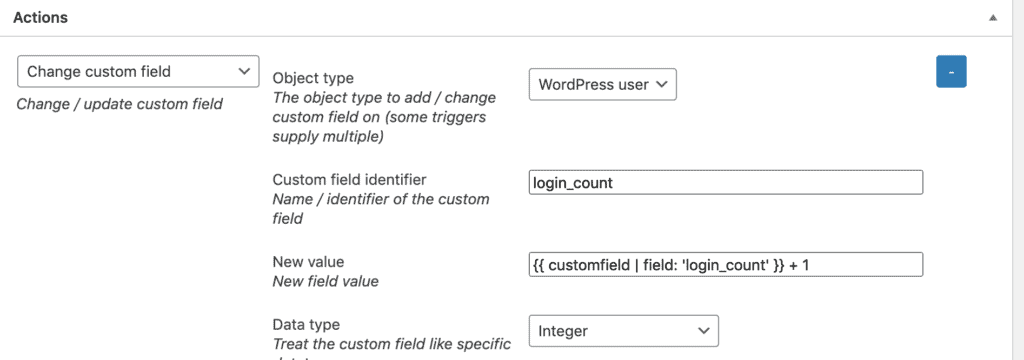
| Field | Description |
| Object type | We have to be explicit about which object we want to add/update the custom field for. In this case we select “WordPress user” since that’s what we want |
| Custom field identifier | This is the name/id that we use to store our value. In the filters that we defined above, we’re checking for “login_count” and that’s what we’re going to use here as well |
| New value | Here’s the interesting part. We using a parameter to fetch any existing value and we’re using a math expression to increase this value with 1. The first time our workflow runs, the existing value will be null/nill/nothing and adding the value “1” to that will be the same as saying 0 + 1 which will result in 1. The important thing here is that we want to set a value that will cause the filters to fail the next time the same user logs in. As long as we’re setting this value to something other than zero (0), the filters are going to prevent this workflow to run a second tiime |
| Data type | We want to treat the “login_count” field to be treated as an integer. |
Action #2 – Send the email
Time to send out the actual email. Our second action is to send the email using a Send HTML Email action:
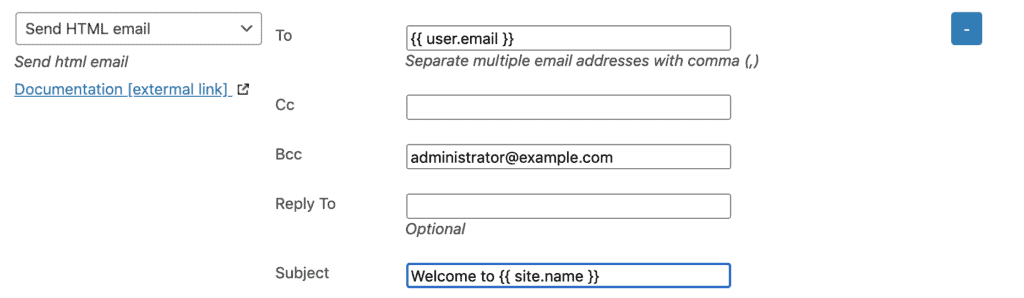
| Field | Description |
| To | The email recipient. We want to send this email to the user that just logged in. We can access the email address of that user using the parameter {{ user.email }} |
| Bcc | We want the site administrator to see all emails that goes out to users, so we’re adding the admins email address as Bcc |
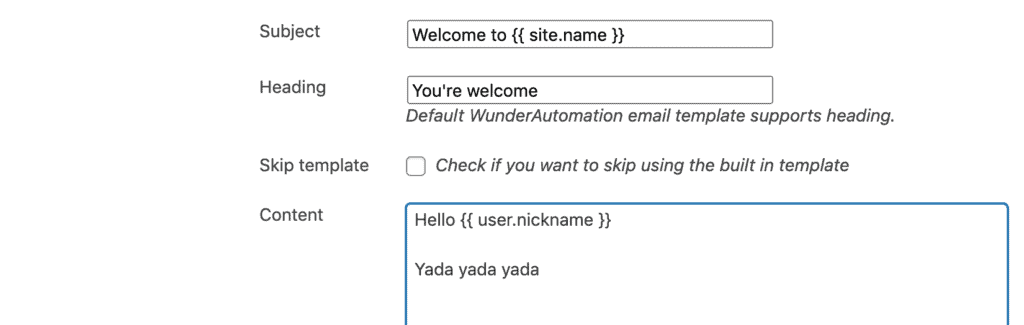
| Subject | We want the recipient to directly see where the email is sent from so we’re adding the site’s name in the email subject. To access the site name, we use the {{ site.name }} parameter |
| Heading | This is a heading that is visible inside the default HTML template. |
| Content | This is where we write the actual email content. To make this a bit more personal, we ‘re using the {{ user.nickname }} parameter to greet the user. |
Wrapping up
In the steps above we showed you how to automatically send out an email to a new user at the first login.
As you’ve probably already guessed, this is just a small taste of what kind of automations you can create in WordPress using WunderAutomation. Sending a custom email message to a new user is really just the tip of an iceberg. You can update user roles, change custom fields or send emails just to name a few potential actions. If the built in triggers, actions and filters are not enough, there are several add-ons to WunderAutomation that makes it easy to interact with other plugins or external services:


Questions, ideas, criticism? Let us know what you think in the comments below.