
This is a quick tutorial to go through the steps of syncing the WordPress user roles with tags in MailChimp.
Tags powerful MailChimp feature that lets you take advantage of extra data about a user to segment your marketing emails. You could be running a WordPress e-learning site with both teachers and students or a market place with both vendors and customers. Surely, some of your email marketing you send out needs to be targeted towards just one of these groups.
In this tutorial, we’re going to show you how you set a tag on all MailChimp contacts with the value of their current role. If you change the role of a user in WordPress, the tag will be updated in MailChimp.
We’re going to use the following parts:
- A MailChimp account – Should also be fairly obvious. Everything we’re going to show in this tutorial works well with a free account. But you can create way more powerful automations with a premium account.
- WunderAutomation (free) – Our Swiss army knife automation plugin for WordPress.
- MailChimp for WunderAutomation (premium, $59 yearly) – Our add-on that adds MailChimp specific functionality to WunderAutomation.
Overview
We’re going to create two workflows with WunderAutomation:
- The first workflow will wait for a notification from MailChimp that a new user has subscribed to our list. When this happens and the email address matches an existing WordPress user, we’re going to update the MailChimp tags with the users current role.
- The second workflow run every time a user gets an updated role. When this happens, we’re going to ask MailChimp to remove any existing role tag and add a new tag representing the new role.
Step 1 – Installing the needed plugins
WunderAutomation installs like any other plugin from the WordPress repository. The easiest way is to go to the plugins section on our WordPress dashboard and click Add new. In the search box, type in “wunderautmation” and follow the usual steps.

MailChimp for WunderAutomation is premium plugin that first needs to be purchased from our store. Once you have received the email with license code and download instructions. Just go ahead and install the plugin using the “Upload plugin” button:

Click install now and then follow the instructions to activate the plugin.
As a last install step, you also need to provide a MailChimp API key. MailChimp does a good job of explaining how to get an API key here. https://mailchimp.com/help/about-api-keys/
Next, in your WordPress admin dashboard, go to Automations -> Settings. Select the MailChimp tab and paste in your API key;

Click “Save Changes” and you’re done.
Step 2 – Setting up the first WorkFlow
The first workflow is the most complex, so let us start there. In the WordPress admin dashboard go to Automations >> Workflows >> Add new to get started.
First we set a name for the workflow and select the MailChimp Webhook trigger. This will reveal a unique URL that will trigger this specific workflow. Copy the URL to the clipboard and continue to step 3.

Step 3 – Add webhook to MailChimp
In this step, we’re going to head over to MailChimp. Open the MailChimp website in a new web browser and log in to your account. Navigate to the Audience section (top menu) and click to reveal the Settings menu and select “Webhooks”:

In here, paste the unique URL you got when you started creating the WunderAutomation workflow:

After this, click “Save” at the bottom of the page. For the purpose of this tutorial, It’s OK to leave all the options at their default values.
Step 4 – Finish creating the workflow
Now let’s go back to the WunderAutomation workflow editor. We’ve already set a trigger, so it’s time to add filters and an an action.
Filters
The first thing we want to do is to set some filters to filter out unwanted updates from MailChimp. Click the “Add filter group” button and add the following filters:

| Filter | Operator / value | Description |
| Update type | Is one of “Subscribe” | Filter out irrelevant MailChimp webhooks. We only want to run this workflow if we get a new subscriber. |
| List | Is one of “[LIST NAME]” | If we have multiple audiences on MailChimp, this filter ensures that we only run our action for the specific list. |
Note: WunderAutomation checks the MailChimp API on a regular basis to always be able to present your list names in the filter dropdown. If you can’t see your lists, it’s most likely because the MailChimp API key wasn’t entered correctly. Head back to step 1 and double check.
Actions
Last part of this workflow is to create an action. We will use an action named MailChimp Add/Remove tag.
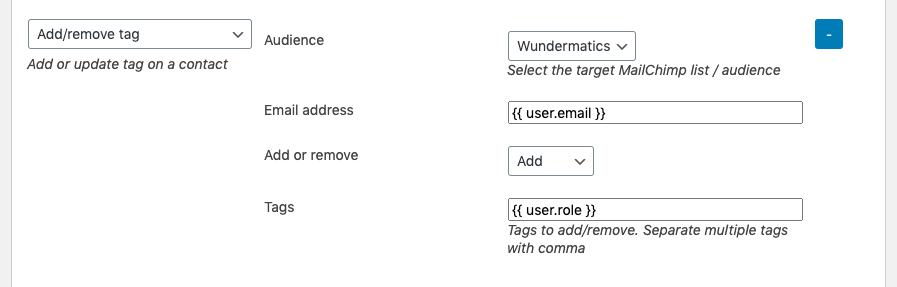
| Field | Value | Description |
| Audience | [YOUR LIST NAME] | The name of the MailChimp audience / list. Must match the list name set in the filters section above |
| {{ user.email }} | This parameter placeholder returns the email address of the user. | |
| Add / remove | Add | If we want to add or remove tags. Since we know we’re working on a new MailChimp subscriber, it doesn’t have any tags set by us yet. We can just add the tag we want |
| Tags | {{ user.role }} | This parameter placeholder returns the name of the users role. |
A note about the {{ user.role }} parameter. When used like shown above, this parameter will return the slug or code of the role. This is the internal identifier that WordPress stores in the database. The value you see on the screen in various drop downs etc. is almost always the label for the role. The role you see as “Administrator” on the screen is internally stored as “administrator” (lower case a). The codes are always going to be the same, but the label might change with translations or because someone just decides to rename it.
Since we’re sending the code/identifier to MailChimp in this tutorial, the tags in MailChimp will show up exactly like that, in lower case letters. If you prefer to use the label instead, you can access this value like this: {{ user.role | return: ‘label’ }}. If you do, please note that you also need to adjust the hard coded list in step 5 below.
This is it for the first workflow. Save the workflow and move to the next step.
Step 5 – Creating the second workflow
The second workflow is going to update the MailChimp contact whenever a users role change in WordPress. After saving the first workflow, go back to the workflow overview and click “Add workflow” again. Don’t forget to name your workflow!
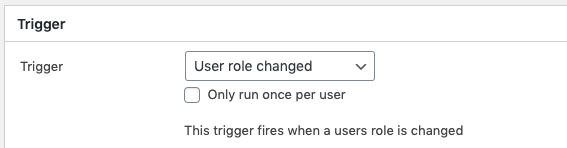
Trigger
We accomplish this by creating a second workflow that triggers when a user role is updated. The trigger is named “User role changed”. Leave the “Only run once” unchecked, however rare it will be, we want to run this every time a user role changes.
Filters
This workflow actually doesn’t need any filters.
Actions
First action:
First, we’re going to remove any tags that already exists on the MailChimp contact that represents a WordPress role. This way we’re getting a “clean sheet” to start with:
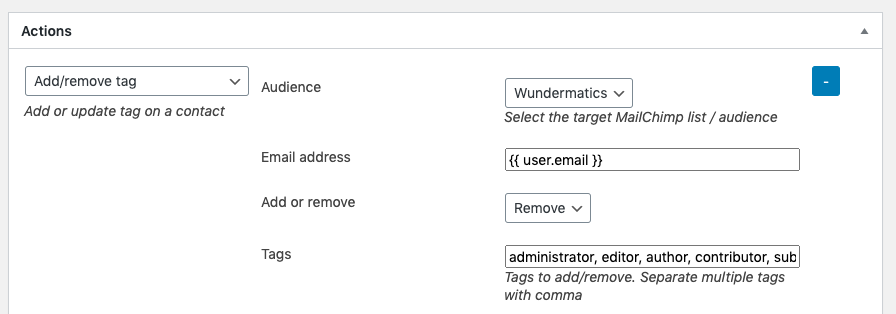
| Field | Value | Description |
| Audience | [YOUR LIST NAME] | The name of the MailChimp audience / list. Must match the list name set in the filters section above |
| {{ user.email }} | This parameter placeholder returns the email address of the user. | |
| Add / remove | Add | If we want to add or remove tags. Since we know we’re working on a new MailChimp subscriber, it doesn’t have any tags set by us yet. We can just add the tag we want |
| Tags | administrator, editor, author, contributor, subscriber | This is a hard coded list of all the roles that exists in a standard WordPress installation. |
A note about the hard coded list of roles. This is the only part where you have to do some of your own research. A standard WordPress installation uses the above five roles. But as you add plugins, it’s quite common that they might add their own roles. WooCommerce will for instance add Customer and Shop Manager to mention a few.
It’s not going to be the end of the word if you don’t get this right the first time. To make sure you get the most important ones, go to the Users section in the admin dashboard and see which roles that are actively in use on your site:
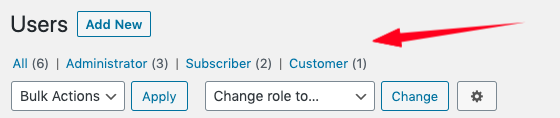
To find the internal code for each of them, click each of the links above and make a note of the last part of the URL:

(we’re looking into making this easier in future versions of WunderAutomation)
Second action:
OK, time for the second action, we know that after the first action, the MailChimp contact has no tags representing a WordPress role. Time to add the current one. As you can see, this is identical to the action we defined for the first Workflow in step 4:
| Field | Value | Description |
| Audience | [YOUR LIST NAME] | The name of the MailChimp audience / list. Must match the list name set in the filters section above |
| {{ user.email }} | This parameter placeholder returns the email address of the user. | |
| Add / remove | Add | If we want to add or remove tags. Since we know we’re working on a new MailChimp subscriber, it doesn’t have any tags set by us yet. We can just add the tag we want |
| Tags | {{ user.role }} | This parameter placeholder returns the name of the users role. |
Summary
With this automation in place, MailChimp will always have an updated tag for all contacts that also exist as a WordPress user.
As you’ve probably already guessed, this is just a small sample of what kind of email marketing automation you can drive using the MailChimp for WunderAutomation add-on. For instance, we’ve recently posted about automatically sending WooCommerce coupons to new MailChimp subscribers.
If you’re curios to give this a go. Please note that we offer a 30 days money back guarantee on all our premium plugins. If you purchase MailChimp for WunderAutomation and find that it doesn’t work as you hoped, just ask us for a refund.
Questions, ideas, criticism? Let us know what you think in the comments below.